Hey guys, it's been a while since the last post.
I thought a lot about deleting my old post, since while I'm studying physics at university I studided also some programming and I realised how difficult are some stuff and how silly are some things I wrote time ago.
But maybe they will be helpful or funny for someone and I was just 13 when I started blogging so, I'll just don't take some stuffs so seriously.
By the way, a thing a like since I was 8 is music, both listening and playing it (piano and a little bit guitar).
Here is a song I wrote and recorded with a friend of mine, hope you enjoy it:
https://youtu.be/fsxASe8know
mercoledì 31 gennaio 2018
lunedì 6 giugno 2016
Update
Hi guys, I know it's been more than an year since the last time I posted something.
During this period many things have happened, today it was my last day at high school and now I just have to do the final exam... I'd like to write something about these last years now, just before I do my exam so that I'll be less influenced by the result of it.
During these years I've discovered that many of the topic I wrote about are much more complicated than I thought but I will not delete my old posts: both because they are like my story and because even if not totally correct they will help somebody maybe.
I studied many interesting things at school, such as some philosophers(Nietzsche and Spinoza are my favourite), maths, physics and others. But I also studied many really really boring things...
However I also continued playing piano and learned to play guitar, I now play in a band called "melting tunas", I attended some really amazing theater courses and discovered the beauty of art. I'm saying this because in this last year I learnt to appreciate (but I mean really deeply, not just saying "ah that's a nice picture") the beauty of art, in theater, music (I discovered a band called radiohead, they are pretty famous and changed my life litterally) and visual arts in general.
Maybe once I liked more mathematical stuffs, and I still do, but I also think that in my life I just will not be able to do ONLY that kind of thing, I really need art and philosophy and literature to bring some kind of beauty to me. I've not changed my mind dramatically, I still find most of latin and italian author boring, but I learned to enjoy some of them!
I came into the world of politics for now I have the right to vote.
During highschool I met wonderful friends, I had my crushes and did many silly, useless and dangerous things with clever and amazing people.
I don't know if I will restart to post as some year ago, but if I will do it I'll change the "format" of my posts.
Sorry for not posting anything for so long time, I just saw that the blog is near to 100 thousands views, great!! :DD
Enjoy yourself,
Dami
sabato 3 gennaio 2015
[update] processing steganography refined
Hi guys I refined my sketch for steganography with processing.
New features:
-hide text not an image
-uses the 2 rightmost bits of each color channel with a total of 6 bits for each pixel
-can hide really long messages (such as Dante's divine comedy or the italian costitution)
The code is too long for posting it here so I'll link you a zip with all files.
Inside you'll find 2 version of the code one more commented and easier to understand and another maybe harder to understand but faster in executing.
Here is the code: link.
I hope you enjoy the code, if you have any question comment or send me an email to damianoandre@gmail.com
Bye, Dami
sabato 20 dicembre 2014
simple image steganography in processing
Hi guys, today I'm posting about a project I started some time ago but which today I refined and made faster.
First of all: what is steganography?
Steganography is the discipline whose purpose is to hide the communication between two people.
Maybe you're wondering what's the difference with criptography (if not go fuck yourself, just kidding): the difference is that while criptography makes the messages between two people not understandable, steganography's purpose is to completly hide the communication.
An example can be: Person A sends to person B a text file about an ordinary topic, but then imagine that in each paragraph of the text there is a number of commas which goes from 0 to 26.
This number could indicate a letter of the alphabet or a "space" (if = 0).
Now, this is a very simple way to send messages and in computer science people exchange lots of data and there are lots of places where you can hide messages (metadata, audio noise, text font etc..).
In this project I'll show you a REALLY simple and rough way to hide an image in another image.
Before going to the code there is an import concept that I'd like to explain: in each byte there are some bit which affect relatively a few the decimal value of the byte.
These bits are called less significant bits (from now I'll refer to them as LSB).
An example: 10010101 = 149
10010100 = 148
so here the Least Significant Bit is this: 10010101 infact here its value affects the decimal number by just one unit.
Now coming back to the idea of steganography in images, for each pixel of an image we have 3 bytes on which we can work: the bytes containing values for red, green and blue colors (and sometimes also for alpha transparency, but I won't talk about this).
Of course the process will work on LSB so the resulting image will be mostly equal to the original (no human eye will notice the difference).
As I said I'll make very simple tutorial so I'll explain you how to hide a binary image (which means with only black and white, NO INTERMEDIATE COLORS) in the blue channel (it's the simplest to work on).
My code has also other limitation due to the fact that I just made a code snippet and not a complete work: the image you want to hide and the "container" image must be of the same size and in .bmp format (I haven't tried other, maybe will work anyway).
Just one more things before the code: to make the program faster I used some bits operation, you want to understand them completly have a look at processing reference for bitwise OR and bitwise AND (maybe also bitshift).
Here is a very simple schematic on how an RGB color variable is stored:

Here is the code:
PImage img, hidden;
int maxw, maxh;
void setup(){
colorMode(RGB, 255);
img = loadImage("img.bmp");
hidden = loadImage("hidden.bmp");
maxw = img.width;
maxh = img.height;
img.loadPixels();
hidden.loadPixels();
}
void draw(){
for(int n = 0; n < maxw*maxh; n++){
if(hidden.pixels[n] == color(255)){
img.pixels[n] = img.pixels[n] | unbinary("000000000000000000000001"); }
else{
img.pixels[n] = img.pixels[n] & unbinary("111111111111111111111110"); }
}
img.save("processed.bmp");
exit();
}
This code, given a "container" image img.bmp and an image to hide(binary) hidden.bmp we'll process them and output to processed.bmp
This final image so contains in the least significant bit of the blue channel a binary image, to extract it you'll have to make another sketch:
PImage img, hidden;
int maxw, maxh;
void setup(){
colorMode(RGB, 255);
img = loadImage("processed.bmp");
maxw = img.width;
maxh = img.height;
img.loadPixels();
hidden = createImage(maxw, maxh, RGB);
hidden.loadPixels();
}
void draw(){
for(int n = 0; n < maxw*maxh; n++){
if((img.pixels[n] & unbinary("000000000000000000000001")) == 0){
hidden.pixels[n] = color(0);
}
else{
hidden.pixels[n] = color(255);
}
}
hidden.save("foundhidden.bmp");
exit();
}
This sketch, given an image (processed with the program above) processed.bmp will extract the hidden image and output it in foundhidden.bmp
Here is a zip with all files: link.
I know it's a really rough sketch but I think it can be useful just to understand some concepts of steganography, if you refine the code (store image in all the channels and use more LSB instead of just one) advise me, I'd be happy to see your work.
Everyone is free to use the code in this post but I'd appreciate if you mention my name.
I hopeyou like this post, if you have any question please comment or send me an email to damianoandre@gmail.com
Bye, Dami
First of all: what is steganography?
Steganography is the discipline whose purpose is to hide the communication between two people.
Maybe you're wondering what's the difference with criptography (if not go fuck yourself, just kidding): the difference is that while criptography makes the messages between two people not understandable, steganography's purpose is to completly hide the communication.
An example can be: Person A sends to person B a text file about an ordinary topic, but then imagine that in each paragraph of the text there is a number of commas which goes from 0 to 26.
This number could indicate a letter of the alphabet or a "space" (if = 0).
Now, this is a very simple way to send messages and in computer science people exchange lots of data and there are lots of places where you can hide messages (metadata, audio noise, text font etc..).
In this project I'll show you a REALLY simple and rough way to hide an image in another image.
Before going to the code there is an import concept that I'd like to explain: in each byte there are some bit which affect relatively a few the decimal value of the byte.
These bits are called less significant bits (from now I'll refer to them as LSB).
An example: 10010101 = 149
10010100 = 148
so here the Least Significant Bit is this: 10010101 infact here its value affects the decimal number by just one unit.
Now coming back to the idea of steganography in images, for each pixel of an image we have 3 bytes on which we can work: the bytes containing values for red, green and blue colors (and sometimes also for alpha transparency, but I won't talk about this).
Of course the process will work on LSB so the resulting image will be mostly equal to the original (no human eye will notice the difference).
As I said I'll make very simple tutorial so I'll explain you how to hide a binary image (which means with only black and white, NO INTERMEDIATE COLORS) in the blue channel (it's the simplest to work on).
My code has also other limitation due to the fact that I just made a code snippet and not a complete work: the image you want to hide and the "container" image must be of the same size and in .bmp format (I haven't tried other, maybe will work anyway).
Just one more things before the code: to make the program faster I used some bits operation, you want to understand them completly have a look at processing reference for bitwise OR and bitwise AND (maybe also bitshift).
Here is a very simple schematic on how an RGB color variable is stored:
Here is the code:
PImage img, hidden;
int maxw, maxh;
void setup(){
colorMode(RGB, 255);
img = loadImage("img.bmp");
hidden = loadImage("hidden.bmp");
maxw = img.width;
maxh = img.height;
img.loadPixels();
hidden.loadPixels();
}
void draw(){
for(int n = 0; n < maxw*maxh; n++){
if(hidden.pixels[n] == color(255)){
img.pixels[n] = img.pixels[n] | unbinary("000000000000000000000001"); }
else{
img.pixels[n] = img.pixels[n] & unbinary("111111111111111111111110"); }
}
img.save("processed.bmp");
exit();
}
This code, given a "container" image img.bmp and an image to hide(binary) hidden.bmp we'll process them and output to processed.bmp
This final image so contains in the least significant bit of the blue channel a binary image, to extract it you'll have to make another sketch:
PImage img, hidden;
int maxw, maxh;
void setup(){
colorMode(RGB, 255);
img = loadImage("processed.bmp");
maxw = img.width;
maxh = img.height;
img.loadPixels();
hidden = createImage(maxw, maxh, RGB);
hidden.loadPixels();
}
void draw(){
for(int n = 0; n < maxw*maxh; n++){
if((img.pixels[n] & unbinary("000000000000000000000001")) == 0){
hidden.pixels[n] = color(0);
}
else{
hidden.pixels[n] = color(255);
}
}
hidden.save("foundhidden.bmp");
exit();
}
This sketch, given an image (processed with the program above) processed.bmp will extract the hidden image and output it in foundhidden.bmp
Here is a zip with all files: link.
I know it's a really rough sketch but I think it can be useful just to understand some concepts of steganography, if you refine the code (store image in all the channels and use more LSB instead of just one) advise me, I'd be happy to see your work.
Everyone is free to use the code in this post but I'd appreciate if you mention my name.
I hopeyou like this post, if you have any question please comment or send me an email to damianoandre@gmail.com
Bye, Dami
domenica 5 ottobre 2014
Main concepts of a grid-based game in processing
This isn't actually a project I worked on but something I did two years ago and I want to share.
For the ones who don't know what a grid based game is, try to think at most of the Pokémon games.
The advantages of creating a grid-based game are:
-lightweight game: all the information (as we'll see) can be stored in a few file and the media files (graphics and sound) are usually a few.
-long-plot game: in this post I'll talk about just the basic concepts but developing this type of game can bring you a endless suite of tools for creating a really long-plotted game.
-easy to code: generally this type of game is easy to code natively (without the use of any external library) and this makes you able to access all the parts of your own engine.
Some concept of my really really simple engine:
1) the game is based on a "map", stored in an array and load from a file
2) in the map moves an element called Personaggio (it's the italian word for "character"), I created a customized class for this
3) the draw() function is used just to draw what's saved in the map array, all the changes to array are made through the keyPressed() function
4) the character moves to a direction (up, down, left, right) which is stored in a variable
Here is the code I wrote, everyone is free to use it but I would appreciate if you mention my name:
//code by Damiano Andreghetti 08/2014
String mapfile = "map.txt";
int msx = 0;
int msy = 0;
int[][] map = new int[1000][1000];
int dir = 0;
int s = 20;
Personaggio personaggio;
void setup(){
loadMap(mapfile);
size(800,800);
}
void draw(){
background(180);
for(int row = 0; row < msy; row++){
for(int col = 0; col < msx; col++){
int val = map[row][col];
if(val == 49){
fill(255,0,0);
rect(col*s, row*s, s, s);
}
if(val == 50){
fill(0, 255, 0);
rect(col*s, row*s, s, s);
if(dir == 0){
fill(0);
line(col*s+s/2, row*s+s/2, col*s+s, row*s+s/2);
}
if(dir == 1){
line(col*s+s/2, row*s+s/2, col*s+s/2, row*s+s);
}
if(dir == 2){
line(col*s+s/2, row*s+s/2, col*s, row*s+s/2);
}
if(dir == 3){
line(col*s+s/2, row*s+s/2, col*s+s/2, row*s);
}
}
if(val == 51){
fill(0, 0, 255);
rect(col*s, row*s, s, s);
}
}
}
}
void loadMap(String mapfile){
String lines[] = loadStrings(mapfile);
msy = lines.length;
msx = lines[0].length();
for (int i = 0 ; i < msy; i++) {
for (int b = 0; b < msx; b++) {
map[i][b] = lines[i].charAt(b);
if(lines[i].charAt(b) == 50){
personaggio = new Personaggio(b,i);
}
}
}
}
class Personaggio {;
int xpos, ypos;
Personaggio(int x, int y){
xpos = x;
ypos = y;
map[ypos][xpos] = 50;
}
void move(int mx, int my){
if(map[ypos+my][xpos+mx] == 48){
map[ypos][xpos] = 48;
xpos += mx;
ypos += my;
map[ypos][xpos] = 50;
}
}
}
void keyPressed() {
if(keyCode == UP){
if(dir == 3){
personaggio.move(0, -1);
}
else{
dir = 3;
}
}
if(keyCode == DOWN){
if(dir == 1){
personaggio.move(0, 1);
}
else{
dir = 1;
}
}
if(keyCode == LEFT){
if(dir == 2){
personaggio.move(-1, 0);
}
else{
dir = 2;
}
}
if(keyCode == RIGHT){
if(dir == 0){
personaggio.move(1, 0);
}
else{
dir = 0;
}
}
}
This is a good map you can use to test it:
11111111111
12000000001
10000000001
10000000003
10000000003
10000000001
10011100001
10010100001
10000100001
10000100001
11111111111
the code is really simple but you can make it better easily, by adding for example:
-sprites
-functions for making the character interact with the environment
-bots
I hope this will be useful for you as a row and basic engine for a grid-based game.
If you have any question about the code just comment or send me an email to damianoandre@gmail.com
Bye, Dami
lunedì 15 settembre 2014
Change grub boot order in Debian
Here is a little tip:
If you have many OS on the same pc (dual boot) and you want to change the grub default choice follow these steps:
-run debian
-open terminal and type
gksu gedit
(this will start gedit, the default linux text editor with root privileges)
-in gedit open the file /etc/default/grub
-There should be a line like GRUB_DEFAULT=0 , you have to put the order number of the OS you want as default instead of 0.
The number of the order start from 0 not from 1
Here is an example:
0 debian
1 debian (recovery mode)
2 windows 7
so if you want windows 7 as default choice change GRUB_DEFAULT=0 to GRUB_DEFAULT=2
-to make the changes effective open the terminal as root (with su command) and type update-grub
-now restart the pc and see if everything worked properly
I hope this tip will be useful to you, if you have any question please comment or send me an email to damianoandre@gmail.com
Bye, Dami
martedì 9 settembre 2014
How to crack WEP password (educational purpose only)
First of all I want to highlight that cracking password of someone else's access point is illegal.
However you can try with your own router just for educational purpose.
Cracking a WEP password is not difficult, you need mainly 2 things:
-a computer with linux installed in it (I use Debian)
-a wifi adapter (we'll talk about this later)
If you don't have linux installed on your computer don't worry, it's easy to install it and you can have both windows and linux on the same pc (this is called dual boot).
I never used a Mac but I know how to install linux within windows:
-create a backup (for safety)
-shrink the main volume (create a blank partition of about 30GB) --> tutorial
-go to https://wiki.debian.org/it/DebianInstaller/Loader and download the Debian installer
-run it and follow the instruction (be careful to install debian in the partition you just created)
-you've done it, when the computer starts you should be able to choose which OS you want to run
To crack the password you'll need some tools provided in the aircrack suite but remember that
aircrack supports only some wifi adapters, here's a list.
Now if you have a compatible adapter (I used one with RTL8187B chipset) with the correct drivers installed you can install aircrack by opening the terminal and typing:
su
[your root password]
apt-get install build-essential
apt-get install wireless-tools
apt-get install aircrack-ng
now you're ready to start:
type iwconfig to list all the wireless interfaces connected to your pc.
When you know which one is the right adapter (it should be called something like wlan0) type:
airodump-ng wlan0
start collecting information about the AP (= access point) you want to crack (bssid and channel) and write them somewhere, beacuse you'll need them.
now open another terminal and type:
airodump-ng -c [the channel of the AP] --bssid [the bssid of the AP] [your device for example wlan0] --ignore-negative-one -w output
This will start capturing initialization vectors (IVs) and when you've collected about 40'000 data packets close the terminal, all the IVs information are saved in a file called output-01.cap
Collecting so many packets can take a while but you can make injections to make this operation faster: see aireplay usage here,
Now that you've collected enough IVs run aircrack to find the password:
aircrack-ng -b [bssid of the AP you want to crack] output-01.cap
Now wait till aircrack find the password.
For the geeks who want to understand how wep cracking works here is an explaination.
I hope you like this post and remember: all the information given in this post are just for educational purpose, use this technique only to crack the password of your own access point.
For any question see aircrack-ng documentation, comment or send me an email to damianoandre@gmail.com
Bye, Dami
giovedì 26 giugno 2014
Arduino color detector
Hi guys I'm here with a really nice project: recognise colors with arduino.
It uses a particular property of colors:
The color of an object depends on both the physics of the object in its environment and the characteristics of the perceiving eye and brain. Physically, objects can be said to have the color of the light leaving their surfaces, which normally depends on the spectrum of the incident illumination and the reflectance properties of the surface, as well as potentially on the angles of illumination and viewing. (from wikipedia)
First of all we are talking about objects which don't emit light by themselves.
Then we know that the color we sense is the light that an object reflects, so:
if we know exactly the quantity of light that goes to an object and then with a sensor we measure the quantity that has been reflected we can know the color of the object.
The main "problems" are two: we have to do this 3 times (for red, green, blue light), the result is influenced by sources of light we can't control (environmental lights).
The solution to the first problem is simply the repetition of the code three time; for the second problem we have to make a calibration for the sensor.
This calibration consist of gathering the maximum and the minimum light that an object can reflect in this particular environment (we have to do also this 3 times).
Hardware:
you'll nedd:
-an arduino
-an RGB led
-a photoresistor
-2x 10Kohm resistor
-a 220ohm resistor
-a pushbutton
then assemble everything this way:

Here is the arduino code:
/*
Color detector with arduino, RGB led and photoresistor
Code by Damiano Andreghetti (also thanks to the adafruit tutorial about the RGB led)
for more information check my blog: www.ilblogdidami.blogspot.com
Everyone is free to use this code, but I would appreciate if you mention my name
*/
int redPin = 11;
int greenPin = 9;
int bluePin = 10;
int buttonPin = 2;
int buttonState = 0;
int phrPin = 0; //photoresistor pin
//other variables for calibrating and measuring
float calwr, calwg, calwb, calbr, calbg, calbb, r, g, b = 0;
//uncomment this line if using a Common Anode LED
#define COMMON_ANODE
void setup(){
pinMode(redPin, OUTPUT);
pinMode(greenPin, OUTPUT);
pinMode(bluePin, OUTPUT);
pinMode(buttonPin, INPUT);
pinMode(phrPin, INPUT);
Serial.begin(9600);
}
void loop(){
buttonState = digitalRead(buttonPin);
if(buttonState == 0){
Serial.println("button pressed: calibrating white");
calibration();
}
else{
measure();
}
}
float readColor(int times){
float avg, total, current = 0;
for(int n = 0; n <= times; n++){
current = analogRead(phrPin);
total += current;
delay(20);
}
avg = total/times;
return avg;
}
void setColor(int red, int green, int blue){
#ifdef COMMON_ANODE
red = 255 - red;
green = 255 - green;
blue = 255 - blue;
#endif
analogWrite(redPin, red);
analogWrite(greenPin, green);
analogWrite(bluePin, blue);
}
/*
This function is needed because the raw measure is influenced by
environmental light.
*/
void calibration(){
//first calibrate with white color
setColor(255, 0, 0);
delay(100);
calwr = readColor(7);
setColor(0, 255, 0);
delay(100);
calwg = readColor(7);
setColor(0, 0, 255);
delay(100);
calwb = readColor(7);
setColor(0, 0, 0);
//then wait until the button is pressed again
//so we can calibrate with black color
Serial.println("waiting to calibrate black");
for(int i = 0; i <= 10; i+=0){
buttonState = digitalRead(buttonPin);
if(buttonState == 0){
//calibrate with black color
setColor(255, 0, 0);
delay(100);
calbr = readColor(7);
setColor(0, 255, 0);
delay(100);
calbg = readColor(7);
setColor(0, 0, 255);
delay(100);
calbb = readColor(7);
setColor(0, 0, 0);
i = 20;
}
else{
//nothing
}
}
}
void measure(){
float deltacal = 0;
setColor(255, 0, 0);
delay(100);
deltacal = calwr-calbr;
r = (readColor(7) - calbr)/(deltacal)*255;
setColor(0, 255, 0);
delay(100);
deltacal= calwg-calbg;
g = (readColor(7) - calbg)/(deltacal)*255;
setColor(0, 0, 255);
delay(100);
deltacal = calwb-calbb;
b = (readColor(7) - calbb)/(deltacal)*255;
Serial.print(int(r));
Serial.print(",");
Serial.print(int(g));
Serial.print(",");
Serial.println(int(b));
}
Now upload this code to the arduino.
To calibrate the sensor press one time the button (the sketch check the button status before the red light) while a white object is near the sensor, then the led turns off.
Now put a black object near the sensor and push the button another time.
The arduino will start writing via serial the RGB value it detects.

Now we're going to use processing to display the result.
Here is a simple sketch:
/*
Sketch used to display the result of the color detector made with arduino
Code by Damiano Andreghetti based on processing serial
for more information and for the arduino schematic and code
check my blog: www.ilblogdidami.blogspot.com
Everyone is free to use this code, but I would appreciate if you mention my name
*/
import processing.serial.*;
Serial port; // Create object from Serial class
String buff; // Data received from the serial port
int r,g,b = 0;
void setup() {
size(600, 600);
noStroke();
// List all the available serial ports in the output pane.
// You will need to choose the port that the Wiring board is
// connected to from this list. The first port in the list is
// port #0 and the third port in the list is port #2.
println(Serial.list());
// use your port
port = new Serial(this, Serial.list()[1], 9600);
}
void draw() {
if (0 < port.available()) {
buff = port.readString();
String[] list = split(buff, ',');
if(list.length == 3){
r = int(list[0]);
g = int(list[1]);
b = int(list[2]);
background(r,g,b);
}
else{
background(r,g,b);
}
}
else{
background(r,g,b);
}
}
To make everything work connect the arduino, calibrate the sensor, and run the processing sketch.
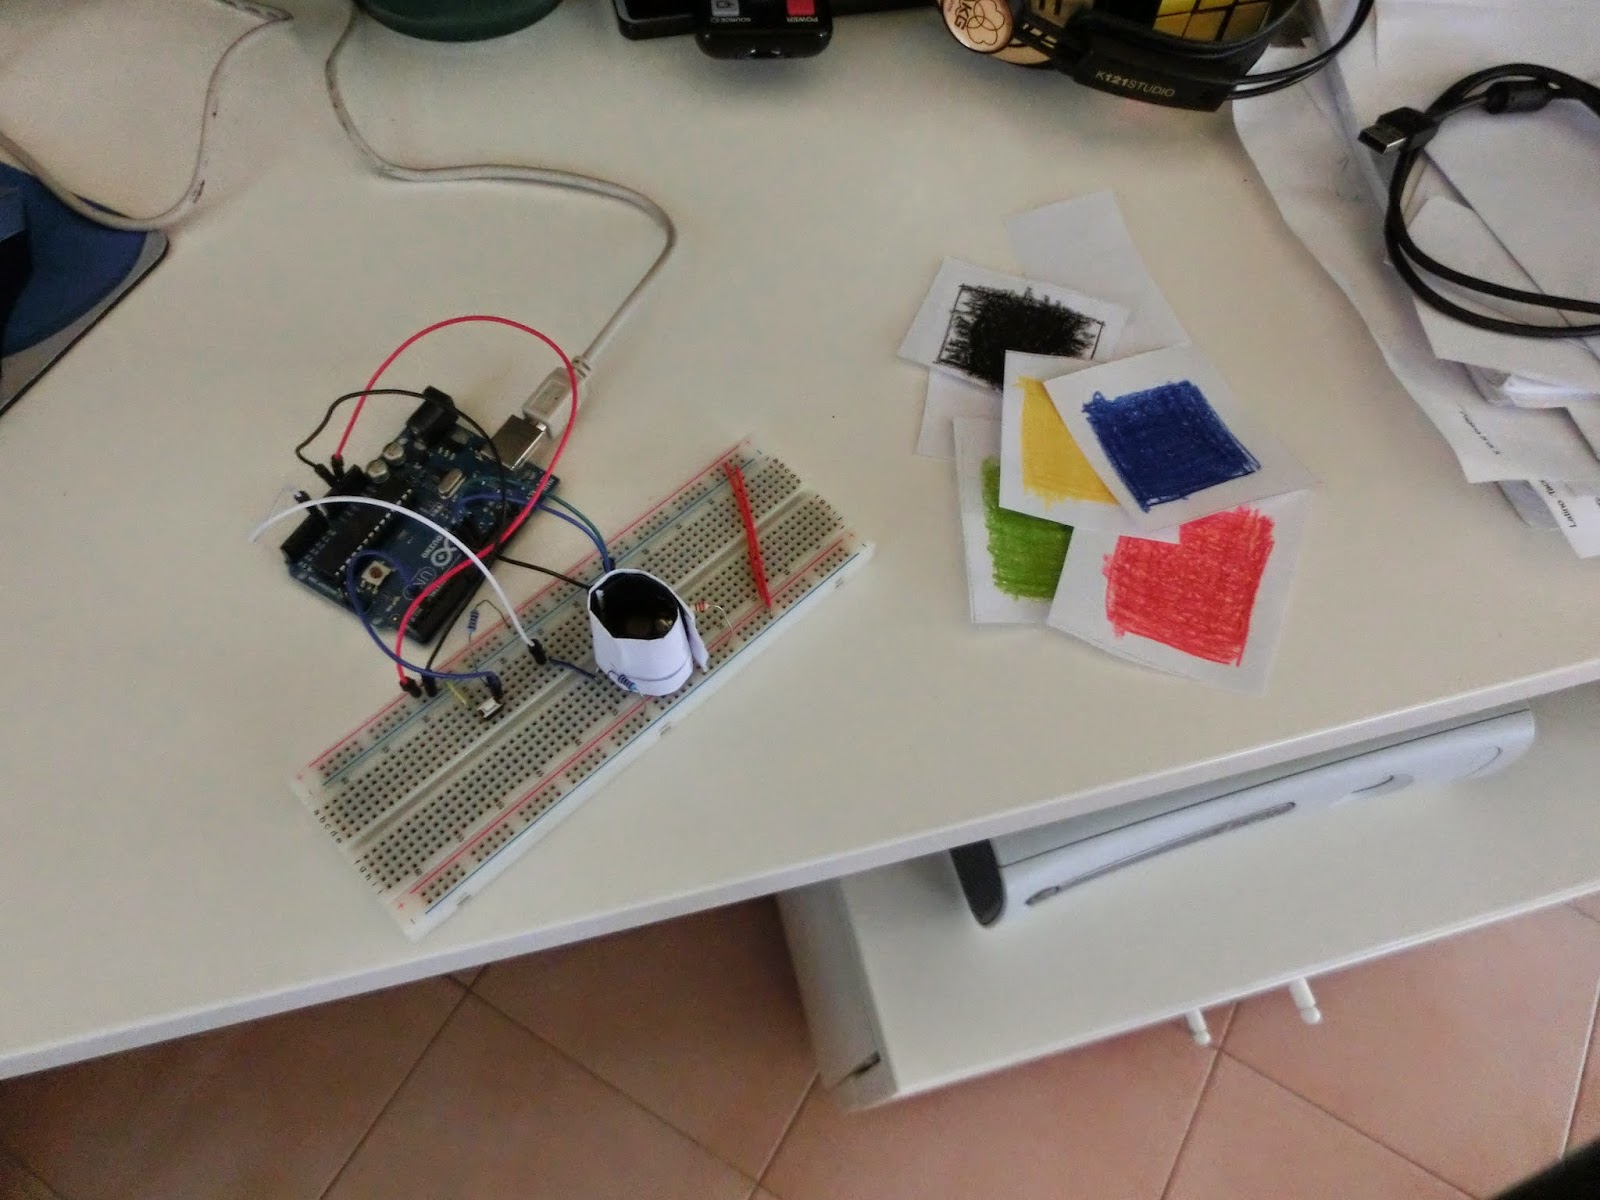
If there are some problems re-calibrate the sensor and use a dark-color cylinder to isolate LED and resistor from the environment. Like this:


Here are other photos of the project:

Here is also a video of the project:
I hope you like this post, if you have any question comment or send me an email to damianoandre@gmail.com
Bye, Dami
It uses a particular property of colors:
The color of an object depends on both the physics of the object in its environment and the characteristics of the perceiving eye and brain. Physically, objects can be said to have the color of the light leaving their surfaces, which normally depends on the spectrum of the incident illumination and the reflectance properties of the surface, as well as potentially on the angles of illumination and viewing. (from wikipedia)
First of all we are talking about objects which don't emit light by themselves.
Then we know that the color we sense is the light that an object reflects, so:
if we know exactly the quantity of light that goes to an object and then with a sensor we measure the quantity that has been reflected we can know the color of the object.
The main "problems" are two: we have to do this 3 times (for red, green, blue light), the result is influenced by sources of light we can't control (environmental lights).
The solution to the first problem is simply the repetition of the code three time; for the second problem we have to make a calibration for the sensor.
This calibration consist of gathering the maximum and the minimum light that an object can reflect in this particular environment (we have to do also this 3 times).
Hardware:
you'll nedd:
-an arduino
-an RGB led
-a photoresistor
-2x 10Kohm resistor
-a 220ohm resistor
-a pushbutton
then assemble everything this way:
Here is the arduino code:
/*
Color detector with arduino, RGB led and photoresistor
Code by Damiano Andreghetti (also thanks to the adafruit tutorial about the RGB led)
for more information check my blog: www.ilblogdidami.blogspot.com
Everyone is free to use this code, but I would appreciate if you mention my name
*/
int redPin = 11;
int greenPin = 9;
int bluePin = 10;
int buttonPin = 2;
int buttonState = 0;
int phrPin = 0; //photoresistor pin
//other variables for calibrating and measuring
float calwr, calwg, calwb, calbr, calbg, calbb, r, g, b = 0;
//uncomment this line if using a Common Anode LED
#define COMMON_ANODE
void setup(){
pinMode(redPin, OUTPUT);
pinMode(greenPin, OUTPUT);
pinMode(bluePin, OUTPUT);
pinMode(buttonPin, INPUT);
pinMode(phrPin, INPUT);
Serial.begin(9600);
}
void loop(){
buttonState = digitalRead(buttonPin);
if(buttonState == 0){
Serial.println("button pressed: calibrating white");
calibration();
}
else{
measure();
}
}
float readColor(int times){
float avg, total, current = 0;
for(int n = 0; n <= times; n++){
current = analogRead(phrPin);
total += current;
delay(20);
}
avg = total/times;
return avg;
}
void setColor(int red, int green, int blue){
#ifdef COMMON_ANODE
red = 255 - red;
green = 255 - green;
blue = 255 - blue;
#endif
analogWrite(redPin, red);
analogWrite(greenPin, green);
analogWrite(bluePin, blue);
}
/*
This function is needed because the raw measure is influenced by
environmental light.
*/
void calibration(){
//first calibrate with white color
setColor(255, 0, 0);
delay(100);
calwr = readColor(7);
setColor(0, 255, 0);
delay(100);
calwg = readColor(7);
setColor(0, 0, 255);
delay(100);
calwb = readColor(7);
setColor(0, 0, 0);
//then wait until the button is pressed again
//so we can calibrate with black color
Serial.println("waiting to calibrate black");
for(int i = 0; i <= 10; i+=0){
buttonState = digitalRead(buttonPin);
if(buttonState == 0){
//calibrate with black color
setColor(255, 0, 0);
delay(100);
calbr = readColor(7);
setColor(0, 255, 0);
delay(100);
calbg = readColor(7);
setColor(0, 0, 255);
delay(100);
calbb = readColor(7);
setColor(0, 0, 0);
i = 20;
}
else{
//nothing
}
}
}
void measure(){
float deltacal = 0;
setColor(255, 0, 0);
delay(100);
deltacal = calwr-calbr;
r = (readColor(7) - calbr)/(deltacal)*255;
setColor(0, 255, 0);
delay(100);
deltacal= calwg-calbg;
g = (readColor(7) - calbg)/(deltacal)*255;
setColor(0, 0, 255);
delay(100);
deltacal = calwb-calbb;
b = (readColor(7) - calbb)/(deltacal)*255;
Serial.print(int(r));
Serial.print(",");
Serial.print(int(g));
Serial.print(",");
Serial.println(int(b));
}
Now upload this code to the arduino.
To calibrate the sensor press one time the button (the sketch check the button status before the red light) while a white object is near the sensor, then the led turns off.
Now put a black object near the sensor and push the button another time.
The arduino will start writing via serial the RGB value it detects.
Now we're going to use processing to display the result.
Here is a simple sketch:
/*
Sketch used to display the result of the color detector made with arduino
Code by Damiano Andreghetti based on processing serial
for more information and for the arduino schematic and code
check my blog: www.ilblogdidami.blogspot.com
Everyone is free to use this code, but I would appreciate if you mention my name
*/
import processing.serial.*;
Serial port; // Create object from Serial class
String buff; // Data received from the serial port
int r,g,b = 0;
void setup() {
size(600, 600);
noStroke();
// List all the available serial ports in the output pane.
// You will need to choose the port that the Wiring board is
// connected to from this list. The first port in the list is
// port #0 and the third port in the list is port #2.
println(Serial.list());
// use your port
port = new Serial(this, Serial.list()[1], 9600);
}
void draw() {
if (0 < port.available()) {
buff = port.readString();
String[] list = split(buff, ',');
if(list.length == 3){
r = int(list[0]);
g = int(list[1]);
b = int(list[2]);
background(r,g,b);
}
else{
background(r,g,b);
}
}
else{
background(r,g,b);
}
}
To make everything work connect the arduino, calibrate the sensor, and run the processing sketch.
If there are some problems re-calibrate the sensor and use a dark-color cylinder to isolate LED and resistor from the environment. Like this:
Here are other photos of the project:
Here is also a video of the project:
I hope you like this post, if you have any question comment or send me an email to damianoandre@gmail.com
Bye, Dami
Iscriviti a:
Post (Atom)